WordPress 3.2: What’s New
WordPress 3.2 (“Gershwin”) has officially been released! This update includes some pretty big changes, so even if you’re not in the habit of backing up your WordPress installation before upgrading, you really should do it this time. Really. We mean it.
Done backing up yet? Good! Let’s get started.

The new Fullscreen Mode in the post editor provides a distraction-free writing space
Here’s some stuff you need to know about the newest version of WordPress:
- Minimum requirements have changed. You’ll need PHP 5.2.4 or greater and MySQL 5.0.15 or greater.
- IE 6 is no longer supported and IE 7 is being phased out.
- There’s a new default theme (Twenty Eleven).
- The Dashboard UI has been refreshed with a brand new look – it’s cleaner, easier on the eyes and sporting some slick typography updates.
- The ‘Press This’ bookmarklet has a new UI as well.
- When creating a post, you can now enter fullscreen mode, a gorgeously distraction-free space that lets you concentrate on writing.
There are a bunch of updates to the core files as well, making WordPress much lighter and faster-loading.
For a full breakdown of the new features, check out the Codex.
I’m Internet Famous (and other lies my stats told me)
Stats can be a great way to keep tabs on how much traffic your site it getting, but remember to take them with a grain of salt.
Different tracking programs register hits in different ways. For example, WordPress.com stats (like the ones I have on this very site) will very helpfully tell you that they don’t count your own visits to your site in your total daily views…but if you’re checking your site from a different browser (or a different device, like your iPad) then all those obsessive clicks to see if your comment count has updated will cause your view count to soar to the stratosphere.
Some stats programs can be configured to ignore all views from your IP address, which can take care of the multiple browsers/devices problem…but if you take a look at some of your site visitors you may notice things called bots or spiders. Those are search engines crawling your site, and they are extremely unlikely to comment to tell you how brilliant you are. Being largely composed of algorithms, bots and spiders just want to make sure your content is relevant.
The Apostrophe is Not Always Your Friend
Apostrophes mean well. They show possession, join together two words into a new conjunction, and (in some very specific cases) indicate plurals.
But that’s their whole problem. The apostrophe, it wants too much. Not content to simply show ownership, the apostrophe creeps into words in which it simply does not belong. It’s the clingy ex hell-bent on showing that you cannot possibly live without it.
Take, for example, the classic its/it’s issue. Usage should be simple: use its when you’re talking about something belonging to it, and use it’s when you’re trying to say it is. But that pesky apostrophe can trip you up. Looking at its, you think that’s not right. If it were Bob’s, there would be an apostrophe before the s. I must mean to use it’s instead. And the apostrophe nods and insinuates itself between the t and the s, despite the fact that it has no business being there at all.
Keep your eye out for the apostrophe. It’s possessive.
Quick Tip: Permalink Structure
 One of the great things about WordPress is the ease with which you can create pretty, semantic URLs. But did you know that some permalink structures can potentially negatively affect your site’s performance?
In his 2009 article on optimizing permalinks, Dougal Campbell wrote about this issue, saying:
If there isn’t some way to narrow down the information in the URL and map it to a specific page or post, the system must perform a lot of database searches to find the correct entry.
His article went on to cite examples of permalink structures which required extra database searches…which included our standby of /%category%/%postname%/. Apparently, since %category% outputs a text field, it takes more time for WordPress to distinguish your post from a page – which requires WordPress to store extra information in its database to compensate.
Indeed, the Using Permalinks page in the WordPress Codex has been updated to include this information:
For performance reasons, it is not a good idea to start your permalink structure with the category, tag, author, or postname fields.
We’re using /%year%/%postname%/ as our default from here on out – how about you?
WordPress 3.1 is out!
 The newest WordPress core update brings a ton of exciting new functionality. We’ll be posting tutorials on how to integrate these new features into your site, but for now here’s a quick breakdown:
 Internal linking made easy: In the olden days (WordPress 3.0 and older), linking to posts and pages on your own site was a chore. You had to find the post, copy the link, paste it into your edit screen…
Not so anymore! The Link dialog in the Edit screen has been re-vamped; now, when you click the little chain-link icon in your editor, you’ll see a searchable list of all your posts and pages. Choose the one you want and it automatically populates the link information (as well as giving you the option of opening the link in a new page). Note: this only works in the visual editor. Sadface for people like me, who live in HTML view.
 The Admin Bar: Taking its cue from WordPress.com, this update gives logged in users an admin bar at the top of their site, giving quick information on and access to comments, updates, stats and shortlinks. It also lets you quickly edit your page or add a new post without opening a new tab. Haters can disable the Admin Bar in your Profile options.
Introducing Post Formats: WordPress exhibits some Tumblr envy with the debut of Post Formats, which allow theme developers to bake in special styling for different types of posts.
Enhanced CMS capabilities: Ever wanted a special archive for a custom post type? Now you can have one. There’s also support for advanced taxonomy and custom fields queries.
Our little WordPress is growing up so fast! *wipes tear* Check back soon for new tutorials and more info.
Custom backgrounds in WordPress 3.0
 This one’s a quickie:
Want to add a custom background that you can switch out whenever you want?
- Open your functions.php file.
- Add the following line of code: add_custom_background();
That’s it. Seriously.
Custom Headers in WordPress 3.0
 Tired of your old header? Want to switch it for something fresh and new? WordPress 3.0 makes it easy. You just need to make a few changes to your functions.php and header.php files, and then you can switch headers as often as you want.
You’ll need FTP access to your site’s theme files (you can do some of this in the Appearance Editor, but it’s easiest if you can upload and download as necessary). You’ll also need to know the height, width, and location of your current or desired header, and you’ll need an image or graphic to use for your new header.
First, we need to set up the function that will define the size of the header image and activate the Headers link in the Appearance menu of your admin screen. Open your functions.php file and paste the following:
define( 'HEADER_IMAGE', '%s/images/header.png' ); // The default header located in themes folder

define( 'HEADER_IMAGE_WIDTH', apply_filters( '', 845 ) ); // Width of header

define( 'HEADER_IMAGE_HEIGHT', apply_filters( '', 365 ) ); // Height of header

define( 'NO_HEADER_TEXT', true );

add_custom_image_header( '', 'admin_header_style' ); // This Enables the Appearance > Header

// Following Code is for Styling the Admin Side

if ( ! function_exists( 'admin_header_style' ) ) :

function admin_header_style() {

?>

<style type="text/css">

#headimg {

height: <?php echo HEADER_IMAGE_HEIGHT; ?>px;

width: <?php echo HEADER_IMAGE_WIDTH; ?>px;

}

#headimg h1, #headimg #desc {

display: none;

}

</style>

<?php

}

endif;
Make sure you change the dimensions to match the size of the header on your actual site. Note that you will also need to upload a default header to your theme’s image directory (if you wish to use your existing header as the default, make sure you change the Header Image name in the function).
Next, you need to display the new header on your site. In your header.php file, add the following:
<img src="<?php header_image(); ?>" width="<?php echo HEADER_IMAGE_WIDTH; ?>" height="<?php echo HEADER_IMAGE_HEIGHT; ?>" alt="Header Image" />
Change the alt text to reflect your image or site.
 Log in to your WordPress admin screen and click “Appearance.” You will now see a link called Header. Click that to access your Custom Header section. You’ll see your default or current header as well as instructions for uploading a new one. You can also revert to your default header or eliminate your header altogether (note that there is no undo for those options, so choose carefully).
To upload a new header, browse for the image or graphic that you want to use (make sure it is at least as wide and high as your specified header dimensions) and click ‘Upload.’ If you need to crop your image, you can do so in the next step. Move the bounding box around until you are happy with the new header image and click Crop & Save.
That’s it! Your new header image will appear on your site, and you can switch it out as frequently as you like.
Questions? Problems? Leave a comment and we’ll do our best to help you out.
Registration is OPEN for WordCamp PDX 2010!
 Don’t miss out on the chance to attend WordCamp PDX this year – there are TONS of speakers (I’m one of them!) and some pretty fab giveaways, including copies of our book!
Registration is open at the official WordCamp site. Don’t forget to tell them your shirt size.
Custom Menus in WordPress 3.0
One of the coolest new features in WordPress 3.0 is the ability to add custom menus. In this post we’ll walk you through the process of adding custom menu support to your existing them as well as setting up the custom menus in the admin section.
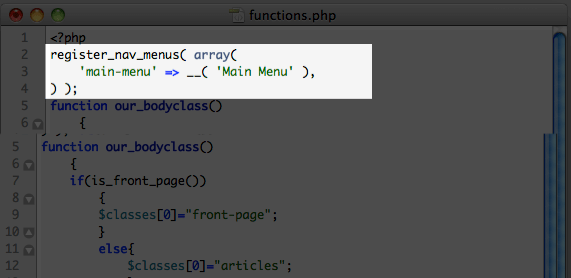
1. Add the register_nav_menus function to your functions.php file.
In your functions.php file, add the following code:
register_nav_menus( array(

'main-menu' => __( 'Main Menu' ),

) );
This will allow your theme to recognize and register a custom navigation menu.
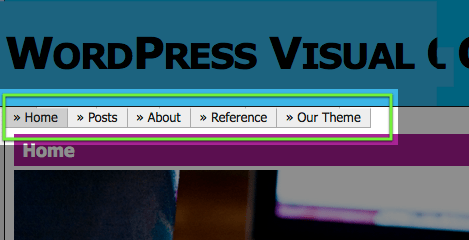
2. Replace the code for your current navigation menu (in your header.php file) with wp_nav_menu.
Open your header.php file and find the section that calls up your navigation menu. It may look something like this:
<?php wp_list_pages(); ?>
Replace that code with this one:
<?php wp_nav_menu( array( 'theme_location' => 'main-menu' ) ); ?>
Using the above code will replace your existing navigation menu with one you specify in the new Menus section (see below).
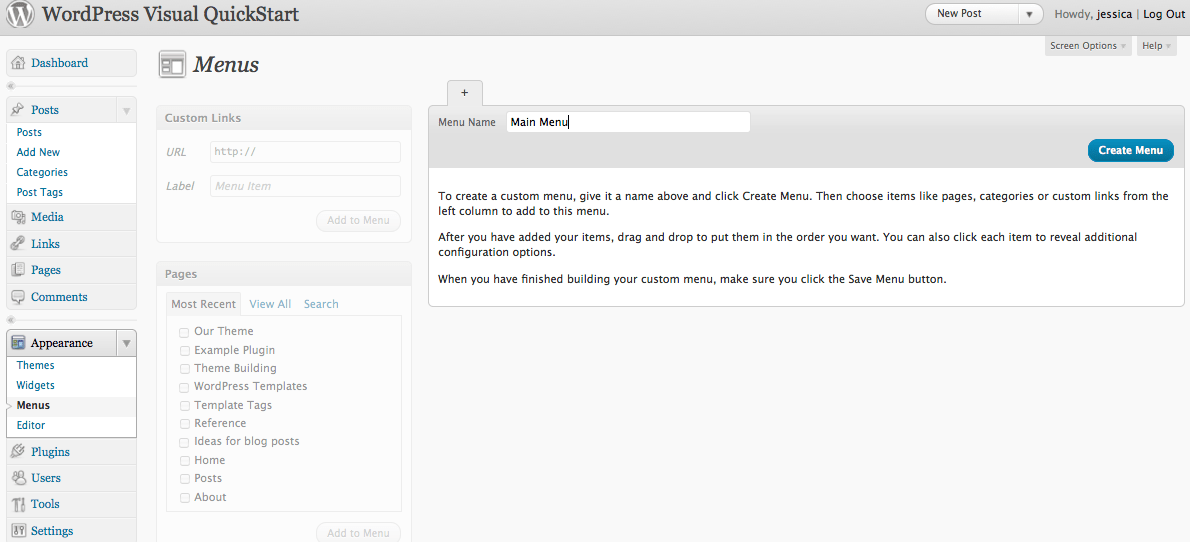
3. Log in to the admin area of your WordPress site and go to Appearance > Menus.
4. Create a new menu. Give your menu a name (this will not be displayed on your site) and add links by choosing from your pages, categories, or custom URLs. Once you’ve added all the links you want to include in your navigation menu, click “Save Menu.”
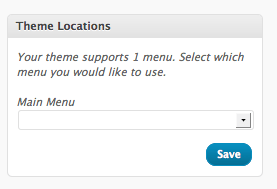
5. In the top left of the Menus section, you will see a box labeled “Theme Locations” which should say the following: Your theme supports 1 menu. Select which menu you would like to use. In the drop-down, choose the menu you just created and hit “Save.”
That’s it! You’ve just set up custom menus for your WordPress theme. You can add, delete or re-order your menu items any time you want.
Additionally, you can add custom menus to your sidebar, too – without touching a single line of code. Just add a new custom menu by clicking the plus sign next to your existing menu. Once you’ve got your new menu named and some menu items in place, go to Appearance > Widgets and choose the Custom Menu widget. Drag it to your sidebar, give it a name, and you’re ready to roll!
Questions? Problems? Leave a comment and we’ll do our best to help you out.